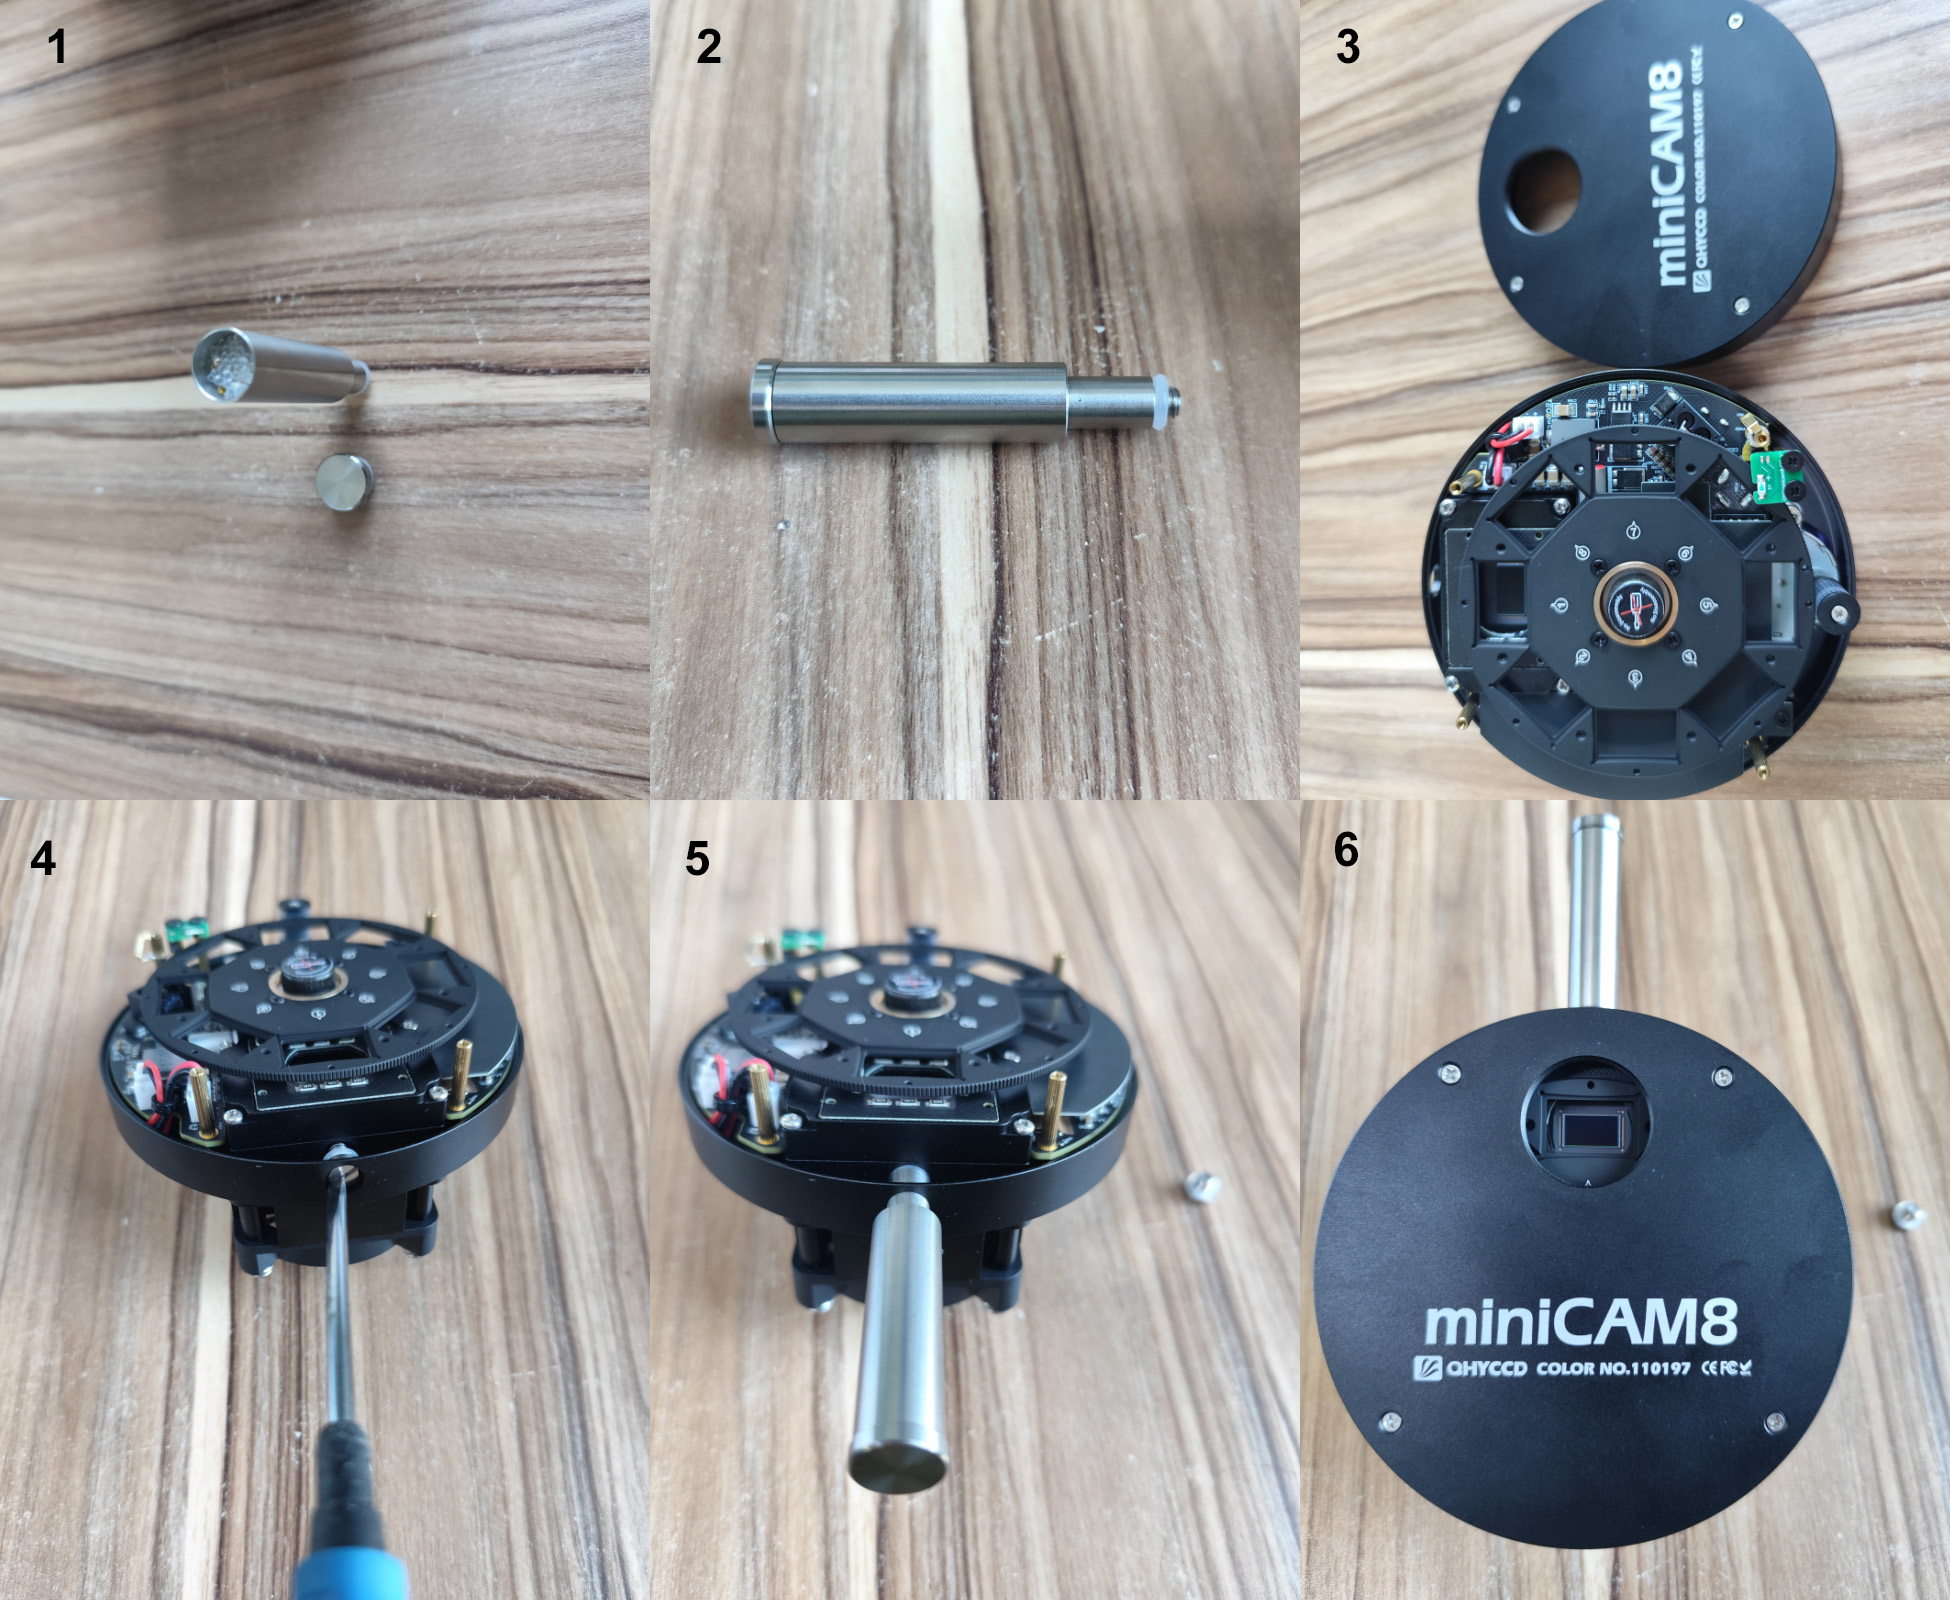
Filters Installation

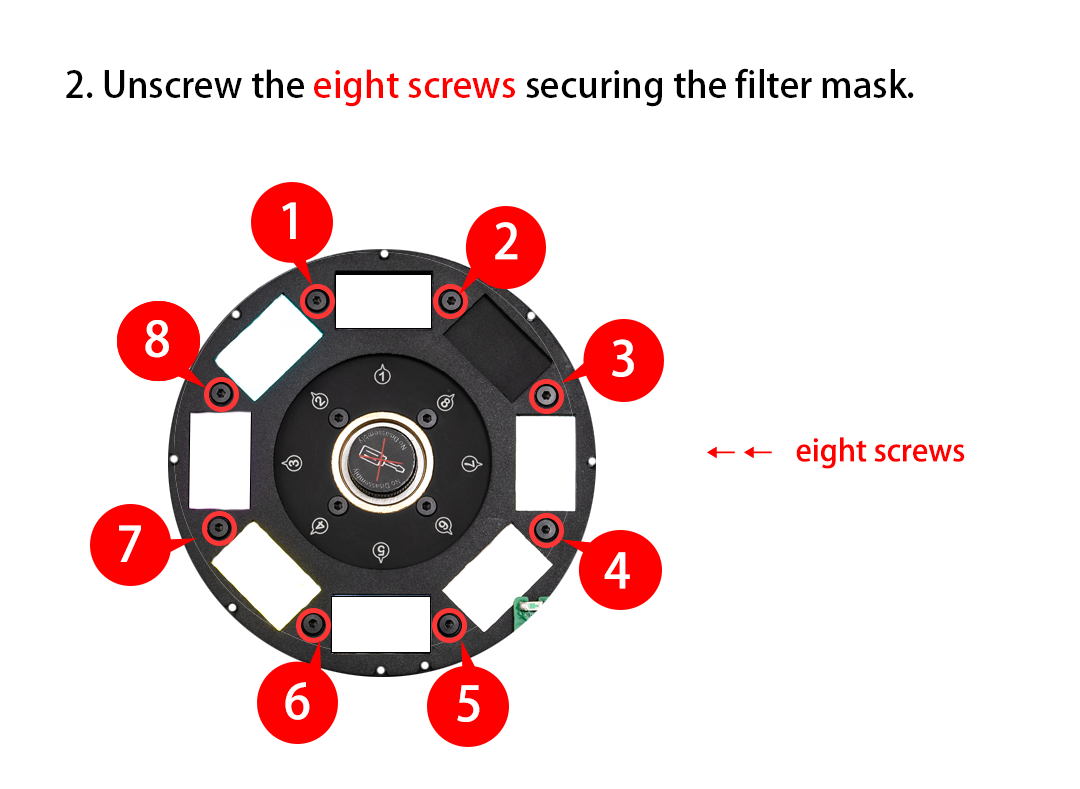
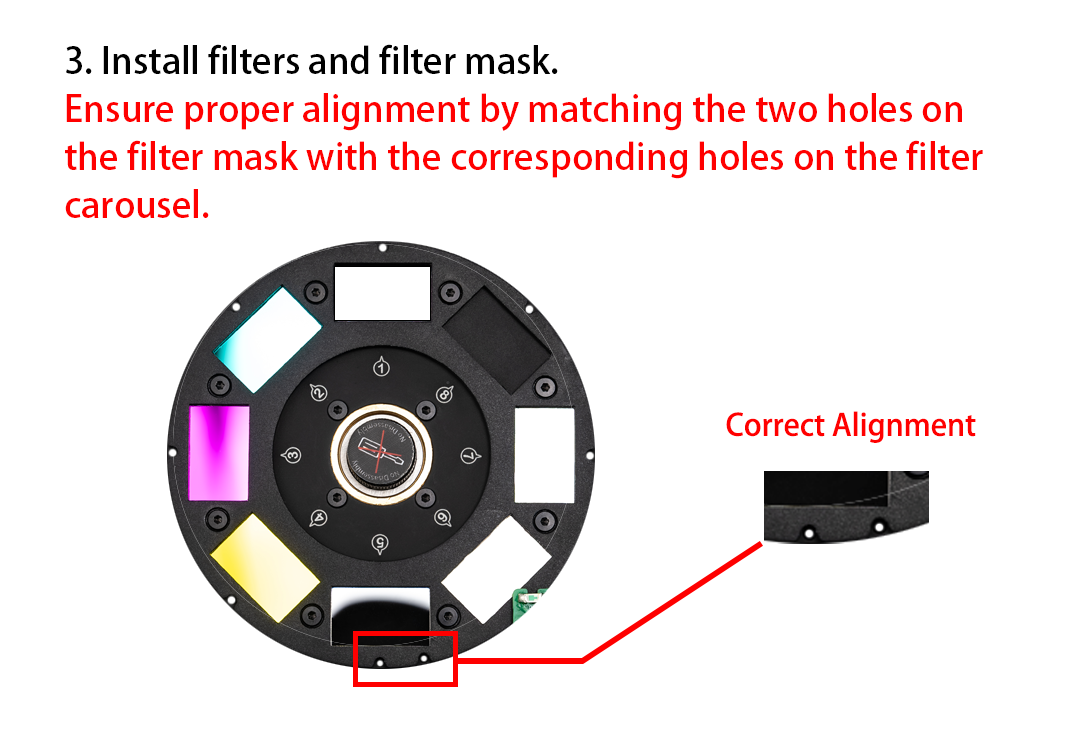
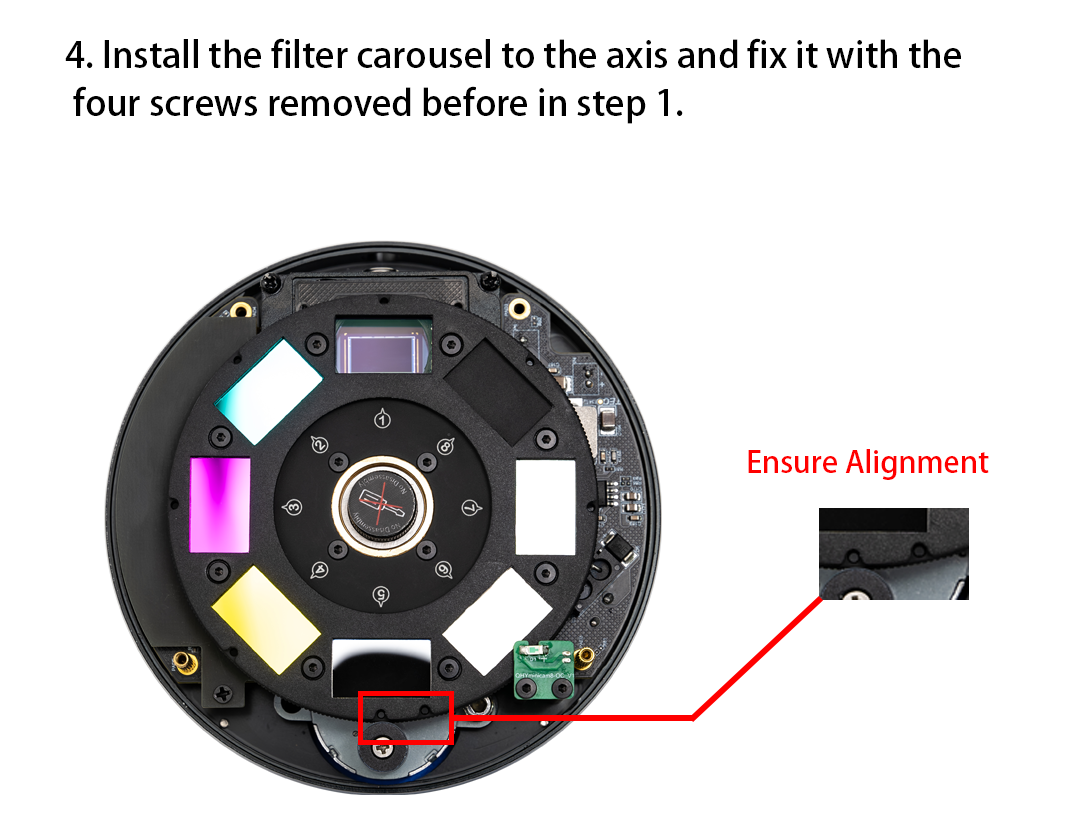

You can also refer to the review video in the link for the filter installation process: https://youtu.be/N-sjPw5zgsM?si=5dNP4vI1J-FokBxI
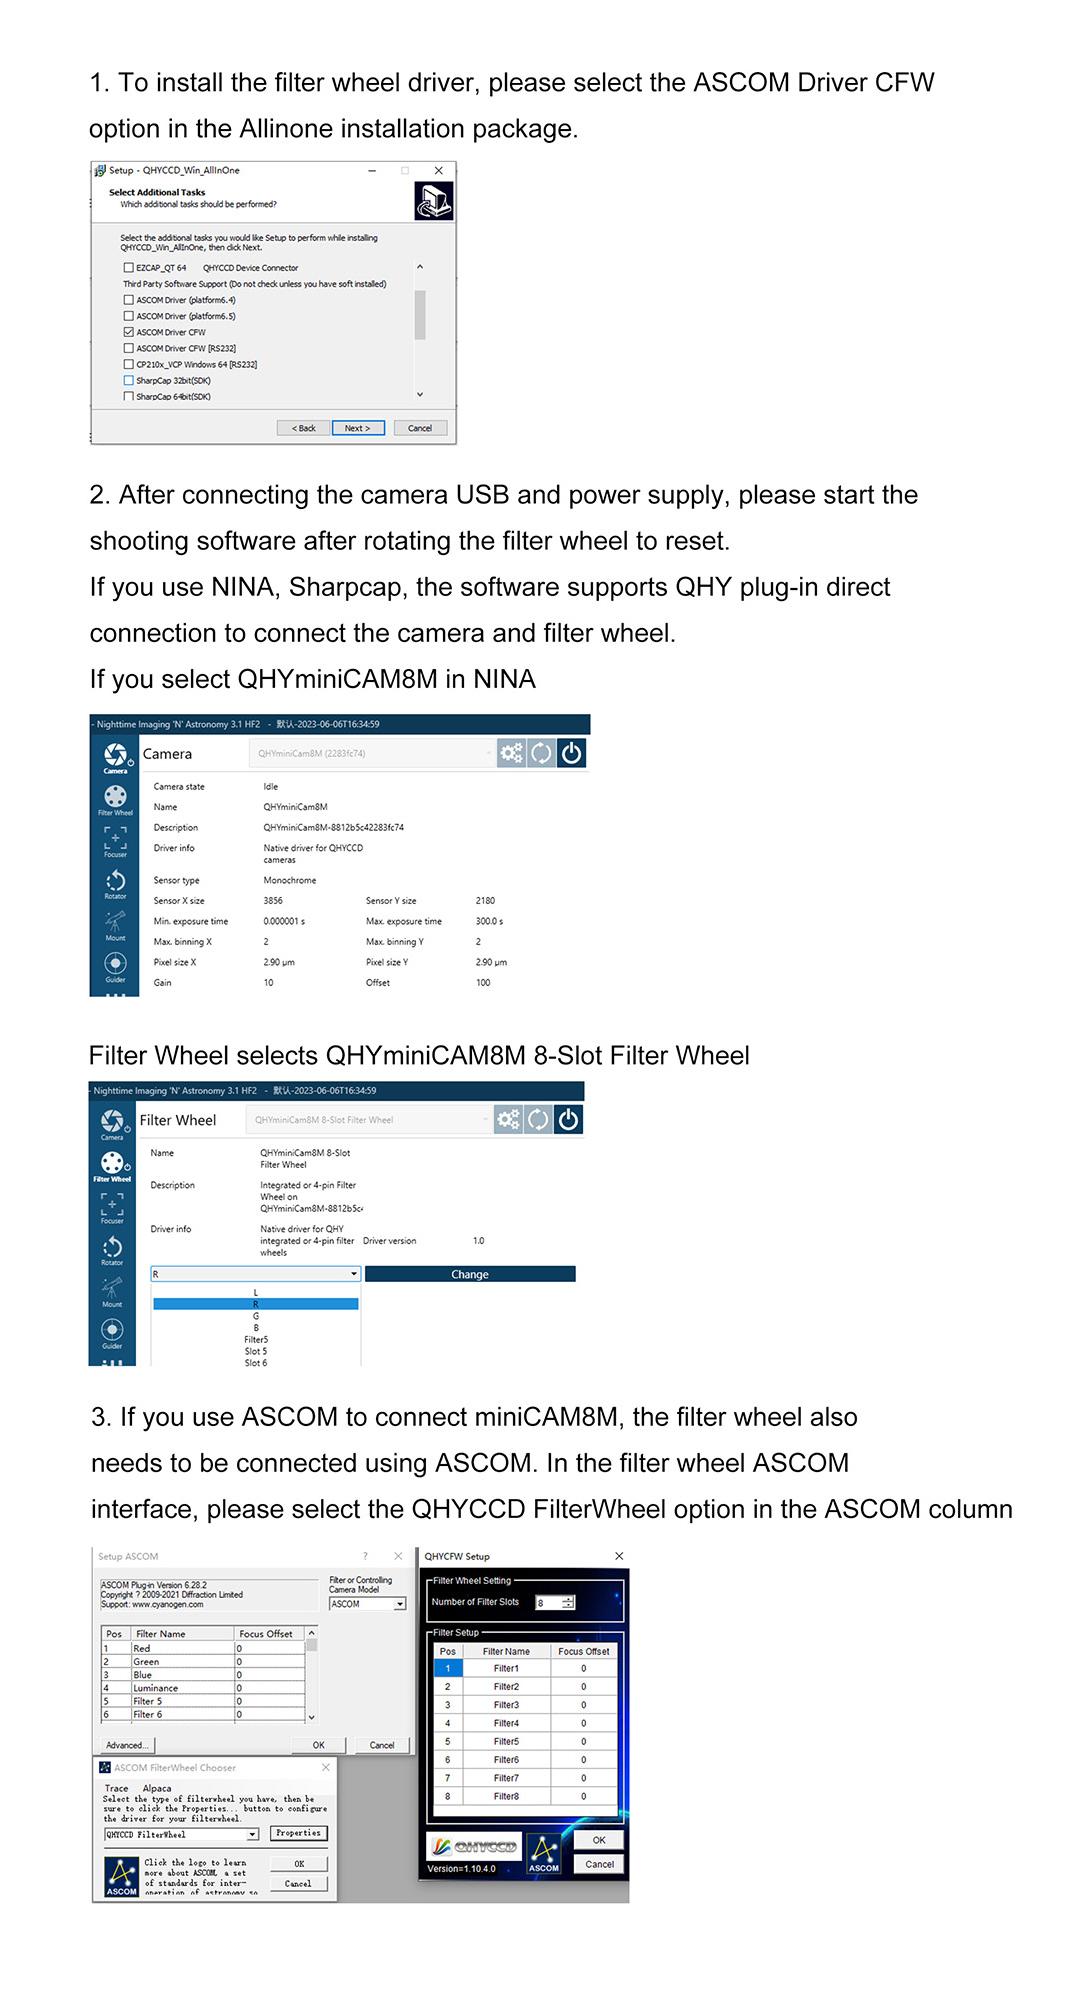
Filter Wheel Drivers Installation
User Guide: HDR Correction of miniCAM8/QHY5III585
FPGA version: 24-12-6 and its later version
SDK version: 24-12-26-12 and its later version
All-in-one version: 24.12.27.10 and its later version
HDR_correction will be on by default. (It is for 16-bit single frames and live, and not available for 8-bit.)
SharpCap version: 4.1.12311 and its later version
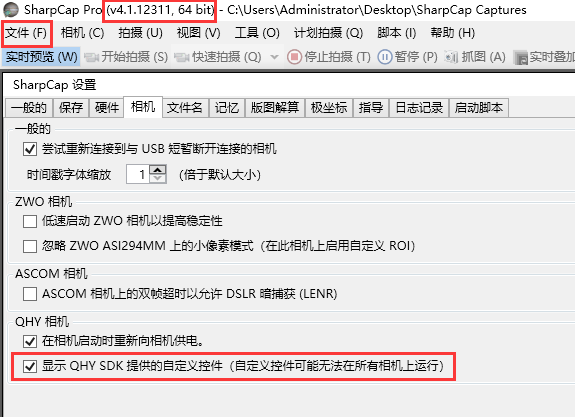
HDR Custom Control in SharpCap: “HDR_correction,” “HDR_L_K,” “HDR_L_b,” and “HDR_showKB”
HDR_L_K: stretch value of the low channel
HDR_L_b: offset value of the low channel
The two values influence the image linearity together.
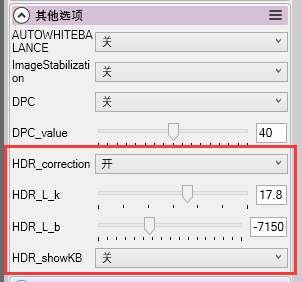 You can manually set values of “HDR_L_k” and “HDR_L_b” by yourself when switching off the “HDR_correction.” But in general we recommend switching it on. Improper values setting will cause issues like image banding.
HDR_showKB: On: values will be shown on the top left of the image; Off: no values shown
User Guide: Start the Camera
Install “All-In-One” Driver & SDK Pack
The camera requires an input voltage between 11V and 13.8V. If the input voltage is too low the camera will stop functioning or it may reboot when the TEC power percent is high, causing a drain on the power. Therefore, please make sure the input voltage arrived to the camera is adequate. 12V is the best but please note that a 12V cable that is very long or a cable with small conductor wire may exhibit enough resistance to cause a voltage drop between the power supply and the camera. The formular is: V(drop) = I * R (cable). It is advised that a very long 12V power cable not be used. It is better to place the 12V AC adapter closer to the camera.
First connect the 12V power supply, then connect the camera to your computer via the USB3.0 cable. Make sure the camera is plugged in before connecting the camera to the computer, otherwise the camera will not be recognized. When you connect the camera for the first time, the system discovers the new device and looks for drivers for it. You can skip the online search step by clicking “Skip obtaining the driver software from Windows Update” and the computer will automatically find the driver locally and install it. If we take the 5IIISeries driver as an example (shown below), after the driver software is successfully installed, you will see QHY5IIISeries_IO in the device manager.
Please note that the input voltage cannot be lower than 11.5v, otherwise the device will be unable to work normally.
All-in-one Pack supports most QHYCCD models only except PoleMaster and several discontinued CCD cameras.
Download Page: https://www.qhyccd.com/download/
Video Tutorial: https://www.youtube.com/embed/mZDxIK0GZRc?start=1
- Since most of the contents of All-in-one package are plug-ins that support third-party software, the third-party capturing software that you want to use must be installed before the All-in-one package. Otherwise the program will report an error.
-
ALL-IN-ONE Pack contains:
- System Driver, which is necessary for the camera operation and must be installed.
- WDM Broadcast Driver, which can provide a live signal to Obs and other live software, you can install it if you have such needs like opeing a live show.
- EZCAP_QT , which is developed by QHYCCD and can be used in QHY devices tests, and management of updates. So even if you won’t use EZCAP_QT for capturing, we suggest you install it.
- Ascom driver, which is necessary for the camera used in Ascom (the latest version of Ascom is 6.6).
- The two sorts of Ascom CFW Drivers correspond to two methods of controling the filter wheel: USB control and camera serial control. It is recommended that both drivers should be installed if you have a filter wheel.
- CP210X_VCP is a serial driver. Some computers come with the driver, but the computer without the driver may be failed of controling the filter wheel.
- SDKs for Third-party Software: Just pick and install the corresponding SDK according to the software you want to use. Don’t forget to check whether the software you are using is 32-bit or 64-bit and select the right SDKs.
- SHARPCAP is also included in the pack, you can choose 32-bit or 64-bit to install. This is authorized by SHARPCAP.
- QT LIB is a plug-in to ensure that 64-bit software can exeuate normally on some computers with poor compatibility.
- Difference between Stable version and Beta Version: Beta version is the latest version, which gives priority to support for the latest products (the stable version may not be compatible with those yet), and has some of the latest optimized ,but experimental features. The stable version is older than the beta version but more stable, so it is recommended for beginners who are not using the latest products.
- Don’t let the camera connect to the computer during the All-in-one pack installation process; connect it to the computer after all the installation is complete.
Connect DSO Imaging Software (e.g. NINA)
Before using software, make sure you have connected the cooling camera to the 12V power supply and connected it to the computer with a USB3.0 data cable. If it’s an uncooled camera, 12V power is not needed. We recommend 64-bit Software, like SharpCAP x64 , N.I.N.A x64. etc., especially when you’re using 16bit cameras.
In NINA, you can select the device to connect to QHY Camera directly without ASCOM driver.
If connecting to the camera via ASCOM is desired, first make sure you have installed both the QHYCCD ASCOM Drivers and ASCOM Platform. Then you would select the appropriate camera driver under the ASCOM section. Then click the Connect icon. Here we take NINA as an example, but it’s similar to other software packages supporting ASCOM, like MaxDL, The SkyX, etc.
Connect Planetary Imaging Software (e.g. SharpCap)
Launch SharpCap. If the software and drivers mentioned above are installed successfully, the video image will appear automatically about 3 seconds after the software loads. You will also see the frame rate in the lower left corner of the software window as shown below.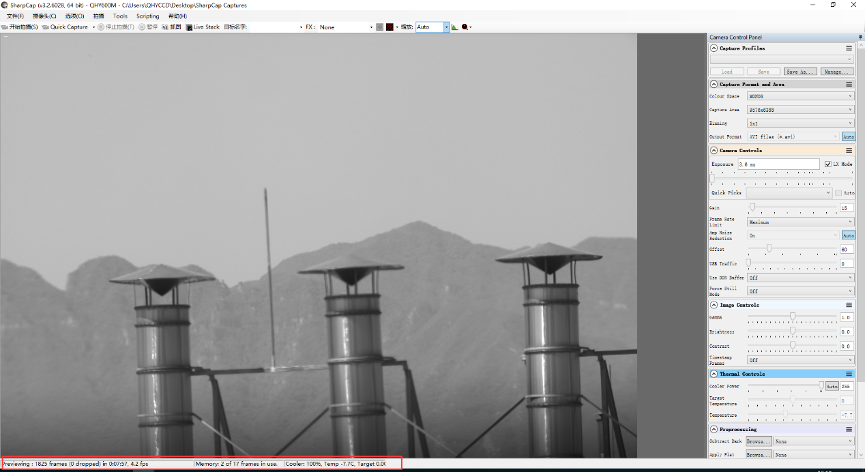
If you have already started the SharpCap software before connecting the camera, in order to open the camera, click on the “camera” in the menu bar and then select the device.
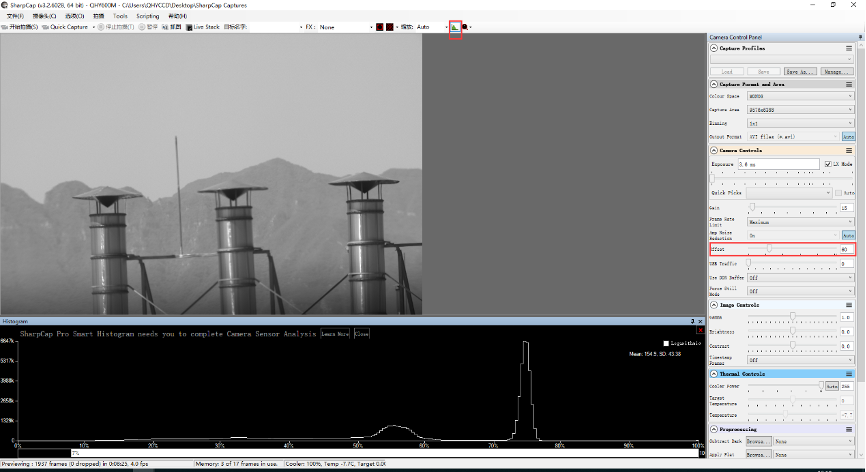
Offset adjustment. When you completely block the camera (i.e., like taking a dark frame) you may find that the image is not really zero. Sometimes this will reduce the quality of the image contrast. You can get a better dark field by adjusting the offset. You can confirm this by opening the histogram as indicated in the figure below.
If you want to enter the 16-bit image mode, select the “RAW16” mode.
By selecting the “LX” mode you can expand the exposure setting range and take long exposures.
After cooling devices connected to the 12V power supply, the temperature control circuit will be activated. You can control the CMOS temperature by adjusting the settings in the figure below. Basically, you can control the temperature of CMOS by either adjusting “Cooler Power” or clicking “Auto” and setting “Target Temperature”. You can also see the CMOS temperature at the lower-left corner of the software window.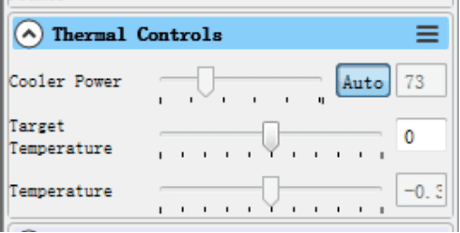
User Guide: Camera Maintenance
Drying the camera CMOS chamber
On the side of the front end of the camera, there is a drying port designed for use with a drying tube to dehumidify the CMOS sealed chamber. If moisture inside the CMOS chamber causes the sensor glass to fog up, you can connect a drying tube to this port for drying. Place effective silica gel desiccant in the drying tube and ensure it contains cotton to prevent dust particles from entering the CMOS chamber. Please refer to the connection instructions below.
Notes:
1. When installing the drying tube, please remove the front cover of the camera to prevent the sealing screws from falling out.
2. Turn off cooling before starting the drying process.